- Jun 13, 2023
Predict House Prices With C# and a CNTK Neural Network
Building deep neural networks in C# has never been easier!
CNTK or the Cognitive Toolkit is Microsoft’s tensor library. It can build, train, and run many types of deep neural networks.
CNTK is fully compatible with dotNET and C#. There’s no need to use Python, you can easily tap into the awesome power of deep neural networks using any NET language, including C#.
CNTK is super easy to use. Watch this, I’m going to build an app that can predict house prices in California using a deep neural network.
The first thing we need is a data file with house prices. The 1990 California census has exactly what we need.
If you want to follow along, download the California 1990 housing census and save it as california_housing.csv in your project folder.
The dataset is a CSV file with 17,000 records that looks like this:
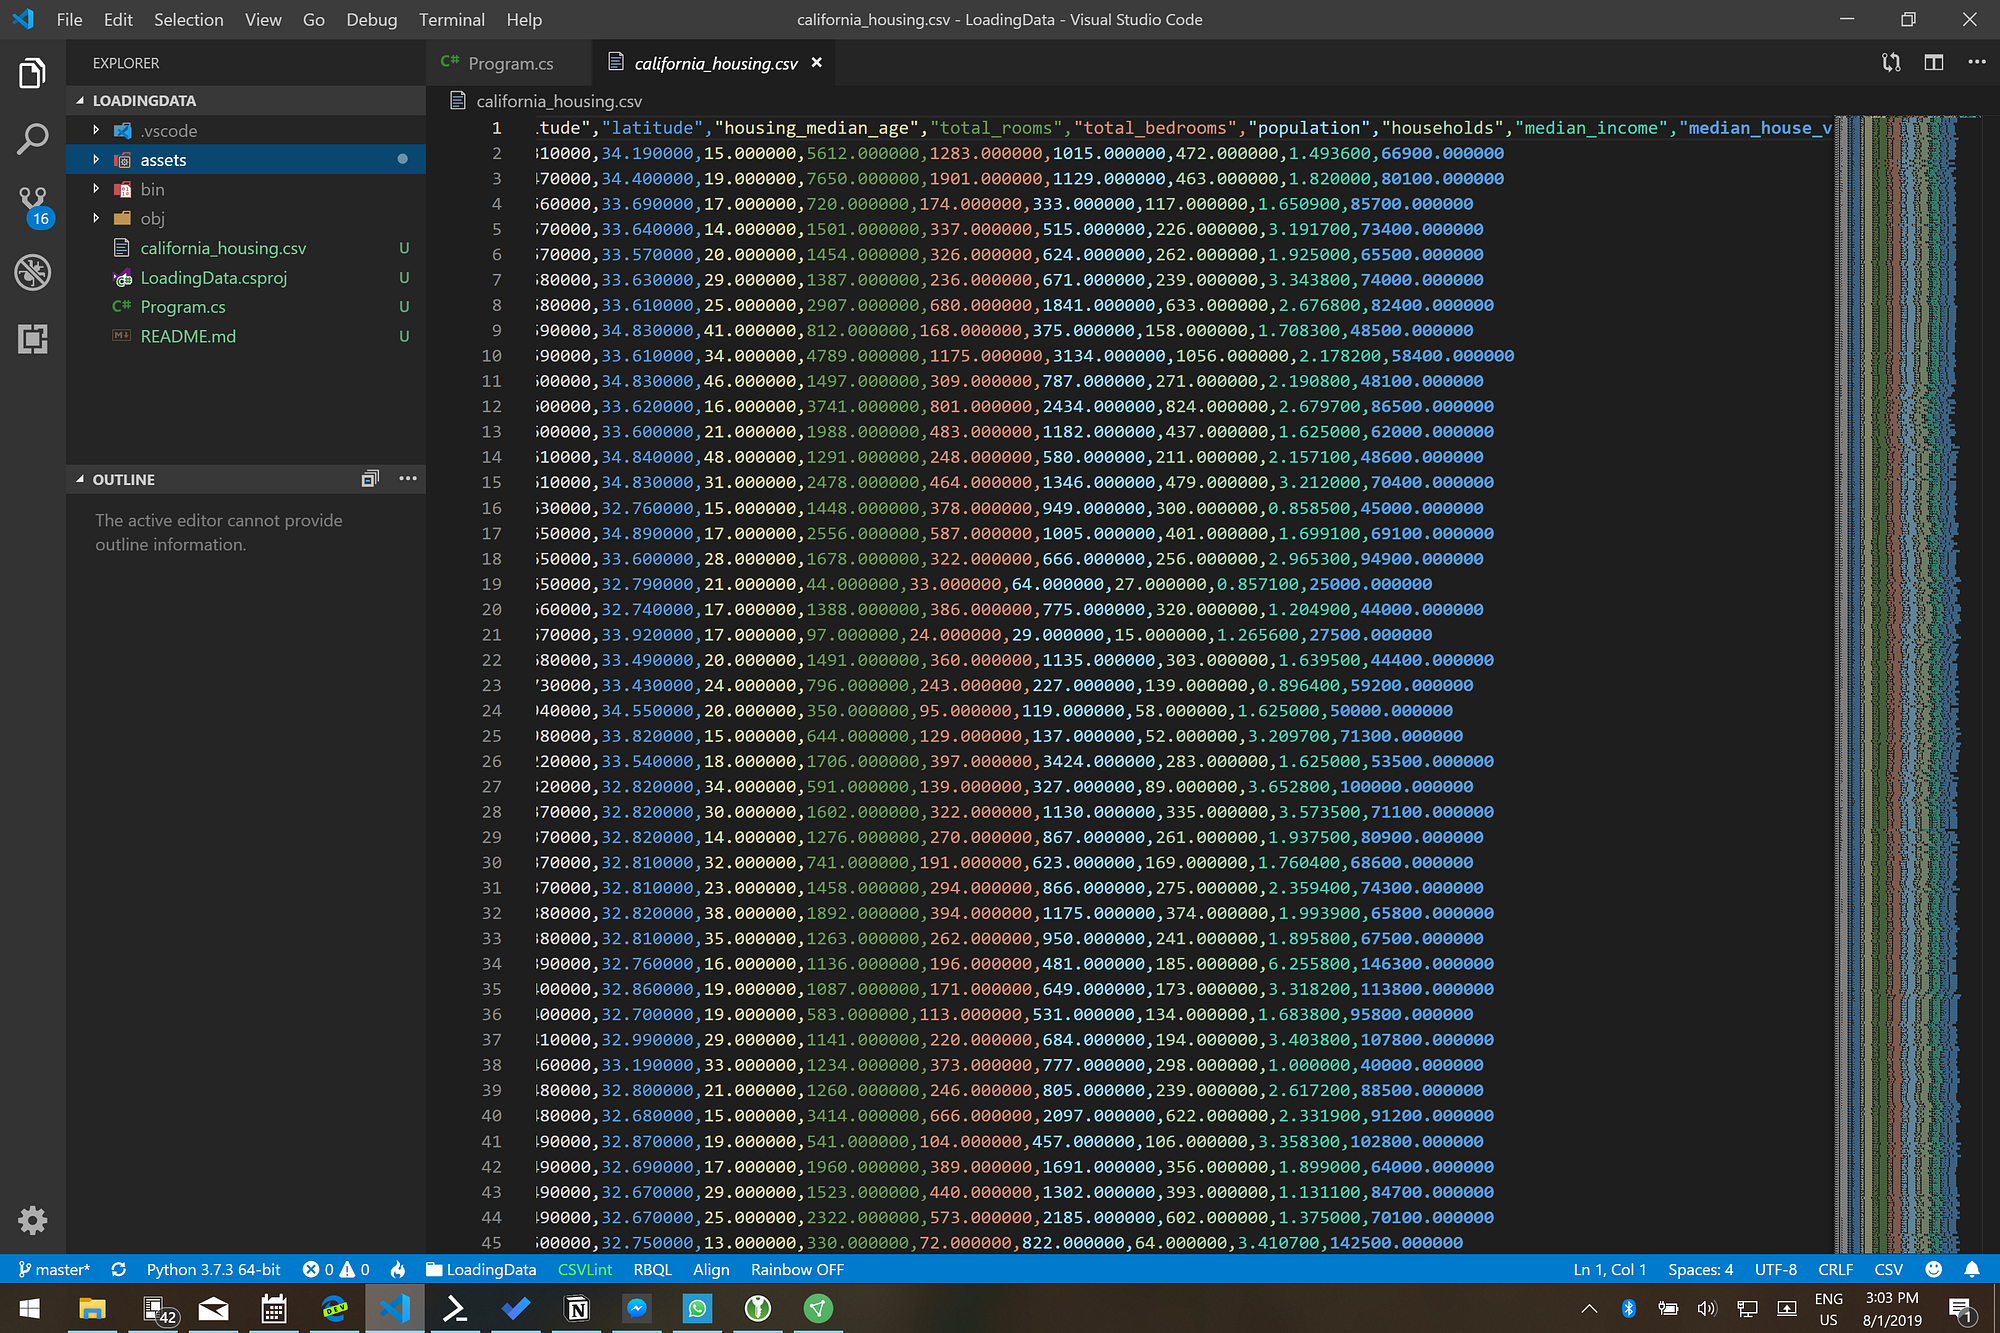
The file contains information on 17k housing blocks all over the state of California:
Column 1: The longitude of the housing block
Column 2: The latitude of the housing block
Column 3: The median age of all the houses in the block
Column 4: The total number of rooms in all houses in the block
Column 5: The total number of bedrooms in all houses in the block
Column 6: The total number of people living in all houses in the block
Column 7: The total number of households in all houses in the block
Column 8: The median income of all people living in all houses in the block
Column 9: The median house value for all houses in the block
We can use this data to train a deep neural network to predict the value of any house in and outside the state of California.
Here’s what the data looks like. This is a plot of all the housing blocks in the dataset color-coded by value:
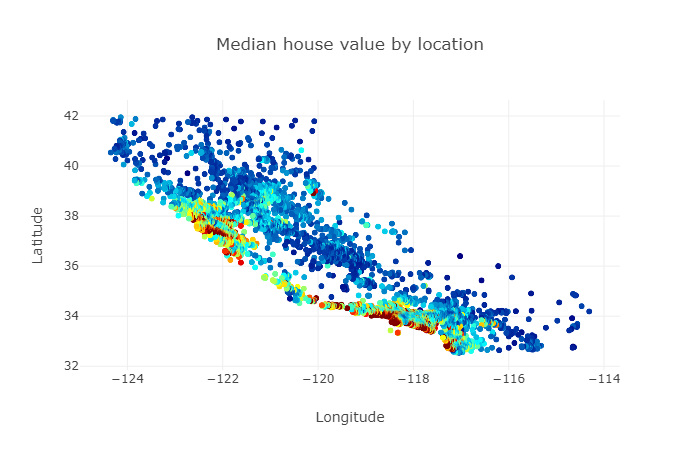
You can sort of see the shape of California, with the highest house values found in the Los Angeles and San Francisco area.
Okay, let’s get started writing code.
Please open a console or PowerShell window. You are going to create a new subfolder for this assignment and set up a blank console application:
$ dotnet new console -o HousePricePrediction
$ cd HousePricePrediction
Also make sure to copy the dataset file(s) into this folder because the code you’re going to type next will expect them here.
Now install the following packages
$ dotnet add package Microsoft.ML
$ dotnet add package CNTK.GPU
$ dotnet add package XPlot.Plotly
$ dotnet add package Fsharp.Core
Microsoft.ML is the Microsoft machine learning package. We will use to load and process the data from the dataset.
The CNTK.GPU library is Microsoft’s Cognitive Toolkit that can train and run deep neural networks.
And Xplot.Plotly is an awesome plotting library based on Plotly. The library is designed for F# so we also need to pull in the Fsharp.Core library.
The CNTK.GPU package will train and run deep neural networks using your GPU. You’ll need an NVidia GPU and Cuda graphics drivers for this to work.
If you don’t have an NVidia GPU or suitable drivers, you can also opt to train and run the neural networks on your CPU. In that case please install the CNTK.CPUOnly package instead.
CNTK is a low-level tensor library for building, training, and running deep neural networks. The code to build deep neural network can get a bit verbose, so I’ve developed a wrapper called CNTKUtil that will help you write code faster.
Please download the CNTKUtil files and save them in a new CNTKUtil folder at the same level as your project folder.
Then make sure you’re in the console project folder and create a project reference like this:
$ dotnet add reference ..\CNTKUtil\CNTKUtil.csprojNow you are ready to add classes. You’ll need a new class to hold all the information for a single housing block.
Edit the Program.cs file with Visual Studio Code and add the following code:
using System;
using System.IO;
using System.Linq;
using CNTK;
using CNTKUtil;
using XPlot.Plotly;
using Microsoft.ML;
using Microsoft.ML.Data;

namespace HousePricePrediction
{
   /// <summary>
    /// The HouseBlockData class holds one single housing block data record.
    /// </summary>
    public class HouseBlockData
    {
        [LoadColumn(0)] public float Longitude { get; set; }
        [LoadColumn(1)] public float Latitude { get; set; }
        [LoadColumn(2)] public float HousingMedianAge { get; set; }
        [LoadColumn(3)] public float TotalRooms { get; set; }
        [LoadColumn(4)] public float TotalBedrooms { get; set; }
        [LoadColumn(5)] public float Population { get; set; }
        [LoadColumn(6)] public float Households { get; set; }
        [LoadColumn(7)] public float MedianIncome { get; set; }
        [LoadColumn(8)] public float MedianHouseValue { get; set; }

        public float[] GetFeatures() => new float[] { Longitude, Latitude, HousingMedianAge, TotalRooms, TotalBedrooms, Population, Households, MedianIncome };

        public float GetLabel() => MedianHouseValue / 1000.0f;
    }

    // the rest of the code goes here...
}
The HouseBlockData class holds all the data for one single housing block. Note how each field is tagged with a LoadColumn attribute that will tell the CSV data loading code which column to import data from.
We also have a GetFeatures method that returns the longitude, latitude, median age, total number of rooms, total number of bedrooms, total population, number of households, and median income level of a housing block.
And there’s a GetLabel method that return the median house value in thousands of dollars.
The features are the house attributes that we will use to train the neural network on, and the label is the output variable that we’re trying to predict. So here we’re training on every column in the dataset to predict the median house value.
Now we need to set up a custom TrainingEngine which is a helper class from the CNTKUtil library that will help us train and run a deep neural network:
/// <summary>
/// HouseTrainingEngine is a custom training engine for this assignment.
/// </summary>
class HouseTrainingEngine : TrainingEngine
{
    /// <summary>
    /// Set up the feature variable.
    /// </summary>
    /// <returns>The feature variable to use.</returns>
    protected override Variable CreateFeatureVariable()
    {
        return NetUtil.Var(new int[] { 8 }, DataType.Float);
    }

    /// <summary>
    /// Set up the label variable.
    /// </summary>
    /// <returns>The label variable to use.</returns>
    protected override Variable CreateLabelVariable()
    {
        return NetUtil.Var(new int[] { 1 }, DataType.Float);
    }

    // the rest of the code goes here...
}
Note the CreateFeatureVariable override which tells CNTK that our neural network will use a 1-dimensional tensor of 8 float values as input. This shape matches the 8 values returned by the HouseBlockData.GetFeatures method.
And the CreateLabelVariable override tells CNTK that we want our neural network to output a single float value. This shape matches the single value returned by the HouseBlockData.GetLabel method.
We’re almost done with the training engine. Our final step is to design the neural network.
We will use the following neural network to predict house prices:
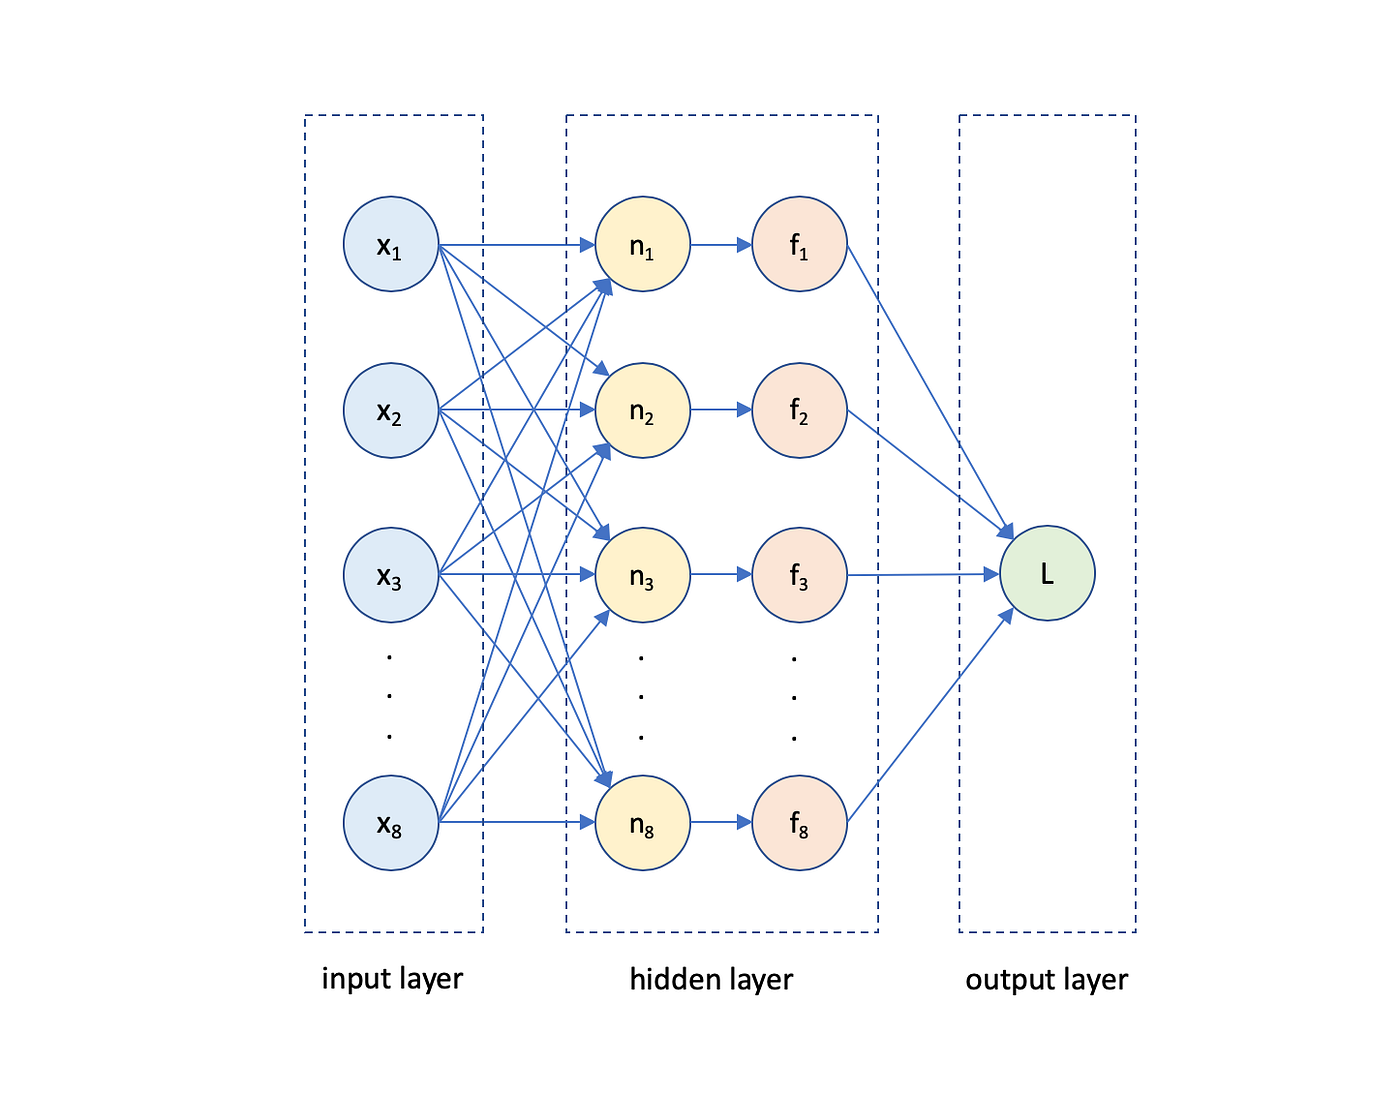
This is a deep neural network with an 8-node input layer, an 8-node hidden layer, and a single-node output layer. We’ll use the ReLU activation function everywhere.
Here’s how to build this neural network:
/// <summary>
/// Set up the model.
/// </summary>
/// <param name="features">The input feature to use.</param>
/// <returns>The completed model.</returns>
protected override Function CreateModel(Variable features)
{
    return features
        .Dense(8, CNTKLib.ReLU)
        .Dense(8, CNTKLib.ReLU)
        .Dense(1)
        .ToNetwork();
}
The CreateModel override builds the neural network. Note how each call to Dense adds a dense layer with the ReLU activation function to the network. The final output layer consists of only a single node without activation.
With the training engine fully set up, we can now load the dataset in memory. We’re going to use an MLNET data pipeline for the heavy lifting:
class Program
{
    /// <summary>
    /// The main entry point of the application.
    /// </summary>
    /// <param name="args">The command line arguments.</param>
    [STAThread]
    public static void Main(string[] args)
    {
        // create the machine learning context
        var context = new MLContext();

        // load the dataset
        Console.WriteLine("Loading data...");
        var data = context.Data.LoadFromTextFile<HouseBlockData>(
            path: "california_housing.csv",
            hasHeader:true,
            separatorChar: ',');

        // split into training and testing partitions
        var partitions = context.Data.TrainTestSplit(data, 0.2);

        // load training and testing data
        var training = context.Data.CreateEnumerable<HouseBlockData>(partitions.TrainSet, reuseRowObject: false);
        var testing = context.Data.CreateEnumerable<HouseBlockData>(partitions.TestSet, reuseRowObject: false);

        // the rest of the code goes here...
    }
}
This code calls the LoadFromTextFile method to load the CSV data in memory. Note the HouseBlockData type argument that tells the method which class to use to load the data.
We then use TrainTestSplit to split the data in a training partition containing 80% of the data and a testing partition containing 20% of the data.
Finally we call CreateEnumerable to convert the two partitions to an enumeration of HouseBlockData instances.
Now we’re ready to set up the training engine. Add the following code:
// set up a new training engine
Console.WriteLine("Setting up training engine...");
var engine = new HouseTrainingEngine()
{
    LossFunction = TrainingEngine.LossFunctionType.MSE,
    MetricType = TrainingEngine.MetricTypeEnum.Loss,
    NumberOfEpochs = 50,
    BatchSize = 16,
    LearningRate = 0.001
};

// the rest of the code goes here
We’re instantiating a new training engine and configuring it to use the MSE metric (= Mean Square Error) to measure the training and testing loss. We’re going to train for 50 epochs with a batch size of 16 and a learning rate of 0001.
Now let’s load the data from the MLNET pipeline into the neural network:
// load the data into the engine
engine.SetData(
    training.Select(v => v.GetFeatures()).ToArray(),
    training.Select(v => v.GetLabel()).ToArray(),
    testing.Select(v => v.GetFeatures()).ToArray(),
    testing.Select(v => v.GetLabel()).ToArray());

// the rest of the code goes here...
The SetData method loads data into the neural network and expects training features, training labels, testing features, and testing labels, in that order. Note how we’re using the GetFeatures and GetLabel methods we set up earlier.
And that’s it. The following code will start the training engine and train the neural network:
// start the training
Console.WriteLine("Start training...");
engine.Train();

// the rest of the code goes here...
After training completes, the complete training and testing curves will be stored in the training engine.
Let’s use XPlot to create a nice plot of the two curves so we can check for overfitting:
// plot training and testing curves
var chart = Chart.Plot(
    new []
    {
        new Graph.Scatter()
        {
            x = engine.TrainingCurve.Select(value => value.X).ToArray(),
            y = engine.TrainingCurve.Select(value => Math.Sqrt(value.Y)).ToArray(),
            name = "training",
            mode = "lines+markers"
        },
        new Graph.Scatter()
        {
            x = engine.TestingCurve.Select(value => value.X).ToArray(),
            y = engine.TestingCurve.Select(value => Math.Sqrt(value.Y)).ToArray(),
            name = "testing",
            mode = "lines+markers"
        }
    }
);
chart.WithXTitle("Epoch");
chart.WithYTitle("Loss (RMSE)");
chart.WithTitle("California Housing Training");

// save chart
File.WriteAllText("chart.html", chart.GetHtml());
This code creates a Plot with two Scatter graphs. The first one plots the TrainingCurve and the second one plots the TestingCurve.
Both curves are defined as the loss values per training epoch. And note the Sqrt method to convert the MSE loss to RMSE ( = Root Mean Square Error).
Finally we use File.WriteAllText to write the plot to disk as a HTML file.
We’re now ready to build the app:
$ cd ../CNTKUtil
$ dotnet build -o bin/Debug/netcoreapp3.0 -p:Platform=x64
This will build the CNKTUtil project. Note how we’re specifying the x64 platform because the CNTK library requires a 64-bit build.
Now type:
$ cd ../HousePricePrediction
$ dotnet build -o bin/Debug/netcoreapp3.0 -p:Platform=x64
This will build your app. Note how we’re again specifying the x64 platform.
Now run the app:
$ dotnet runThe app will create the neural network, load the dataset, train the network on the data, and create a plot of the training and testing loss for each epoch. The plot is written to disk in a new file called chart.html.
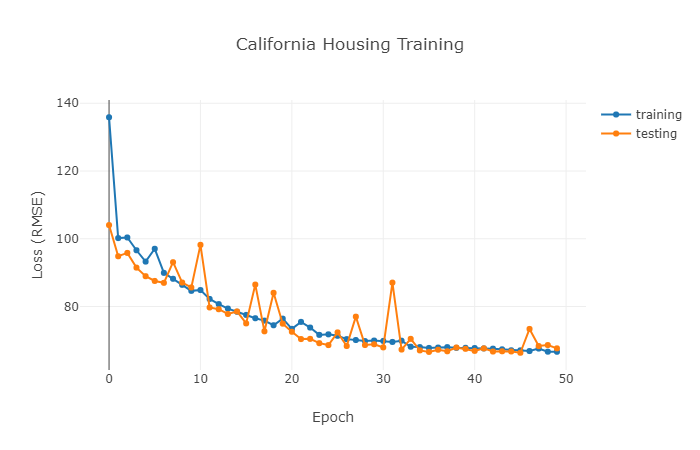
Here’s what it looks like:
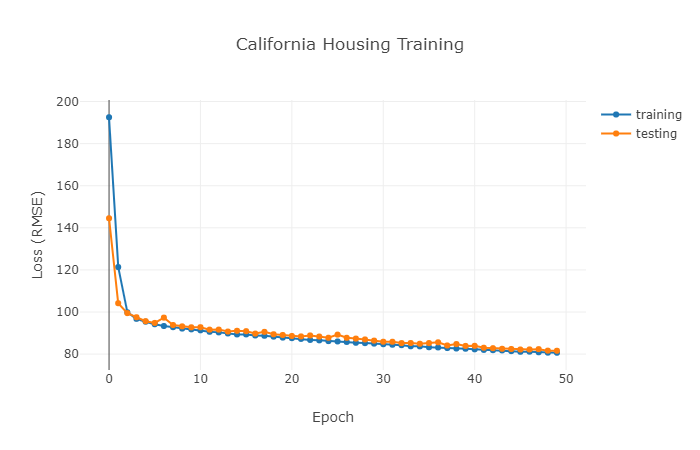
The training and testing curves stay close together with the loss slowly dropping with each successive epoch. There is no hint of overfitting.
The final RMSE is 80.64 on training and 81.59 on testing. That’s not a bad start.
Now I’ll expand the number of nodes in each neural network layer to 64. I will change the CreateModel method in the TrainingEngine class as follows:
/// <summary>
/// Set up the model.
/// </summary>
/// <param name="features">The input feature to use.</param>
/// <returns>The completed model.</returns>
protected override Function CreateModel(Variable features)
{
return features
.Dense(64, CNTKLib.ReLU) // 64 nodes in this layer
.Dense(64, CNTKLib.ReLU) // 64 nodes in this layer
.Dense(1)
.ToNetwork();
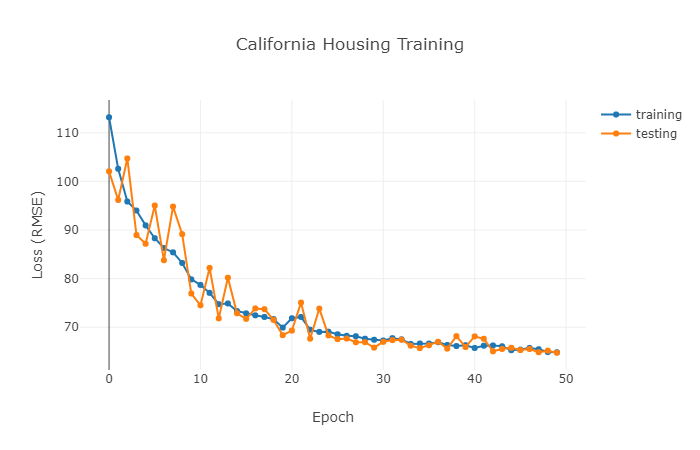
}The neural network now has 4,801 trainable parameters.
And here’s the result:
The training process is more unstable now, with some epochs reporting a large testing loss. But the network always corrects itself in subsequent epochs and there’s still no sign of overfitting.
The final RMSE is now 66.63 for training and 67.64 for testing. A nice improvement!
Now let’s add another layer. With the extra layer the neural network now has 8,961 trainable parameters:
/// <summary>
/// Set up the model.
/// </summary>
/// <param name="features">The input feature to use.</param>
/// <returns>The completed model.</returns>
protected override Function CreateModel(Variable features)
{
    return features
        .Dense(64, CNTKLib.ReLU)
        .Dense(64, CNTKLib.ReLU)
        .Dense(64, CNTKLib.ReLU)  // extra neural layer
        .Dense(1)
        .ToNetwork();
}
And here is the result:

The training curves look about the same, with a final RMSE of 65.01 for training and 65.55 for testing. Even though I doubled the number of trainable parameters in the network, the results hardly improved.
Let’s do one more experiment. I’ll remove the extra layer and increase the number of nodes in each layer to 128. The neural network now has 17,793 trainable parameters:
/// <summary>
/// Set up the model.
/// </summary>
/// <param name="features">The input feature to use.</param>
/// <returns>The completed model.</returns>
protected override Function CreateModel(Variable features)
{
    return features
        .Dense(128, CNTKLib.ReLU)  // 128 nodes in this layer
        .Dense(128, CNTKLib.ReLU)  // 128 nodes in this layer
        .Dense(1)
        .ToNetwork();
}
And here are the results:
Again the curves look unchanged, with a final RMSE of 64.73 for training and 64.84 for testing.
You can see that adding more hidden layers or increasing the number of nodes per layer is not improving the final results. We’re not getting the loss below 64.
In machine learning we’re always looking for the most simple model that provides the most accurate predictions, because if we make the model too complex it will tend to overfit.
So it looks like for this dataset the optimal neural network that delivers the best tradeoff on accuracy and complexity is the second one we tried, with two 64-node layers.
Deep Learning With C# And CNTK
This code example is part of my online training course Deep Learning with C# and CNTK that teaches developers how to build machine learning applications in C# with Microsoft's CNTK deep learning library.
I made this training course after I had completed a course on TensorFlow and Python. I started wondering if it would be possible to use C# code to weave neural network layers together to create advanced deep learning applications.
After a bit of research, I discovered the Microsoft CNTK library. Despite the fact that this library is end of life and is no longer supported by Microsoft, it can still be used to build advanced neural architectures.
So please check out this course if you like. It will get you up to speed on deep learning with C# and CNTK, and covers regression, classification, neural networks, convnets, CNNs and RNNs, transfer learning, finetuning, data augmentation, and much more.
Featured Blog Posts
Check out these other blog posts that cover topics from my training courses.
Featured Training Courses
Would you like to learn more? Then please take a look at my featured training courses.
I'm sure I have something that you'll like.
MDFT Academy
- Community
Become a member and get access to every online training course on this site.
Would You Like To Know More?
Sign up for the newsletter and get notified when I publish new posts and articles online.
Let's stay in touch!