- Oct 19, 2023
Insert Yourself Into Any Picture With C#, Dlib, and OpenCV
Did I tell you about that time when I partied in Hollywood with Bradley Cooper?
This was back in 2014 at the Oscars. I was in the audience, hanging out with Bradley, Jennifer Lawrence, Julia Roberts, and Jared Leto. Then all of a sudden Ellen DeGeneres walked right up to me, handed me her cellphone, and asked me to take a selfie!
Crazy, right? Here’s the picture I took:

Just kidding!
That’s actually Bradley Cooper front and center. I used a C# ‘face-swapping’ app to superimpose my face over his, and digitally insert myself into the famous DeGeneres Oscar selfie.
Would you like to learn how I did that?
Let’s find out how to tackle this problem in C#. I am going to use the awesome Accord library which is perfect for creating computer vision apps.
I’ll also use OpenCvSharp3, a C# wrapper for the awesome OpenCV library. I will be using a couple of image transformation functions from this library.
And I’m going to be using DLib. In the computer vision world, this is the go-to library for face detection. It’s written entirely in C++ but fortunately there is a wrapper called DlibDotNet that exposes all functionality to C#.
So the first thing I need is the original selfie:

And a nice picture of me where I’m looking roughly in the same direction as Bradley:

The Dlib library has fantastic support for face detection, so that’s what I’m going to start working with.
I’ll start by detecting all Landmark Points in Bradley Cooper’s face. Landmark points are predetermined and numbered locations on a face:
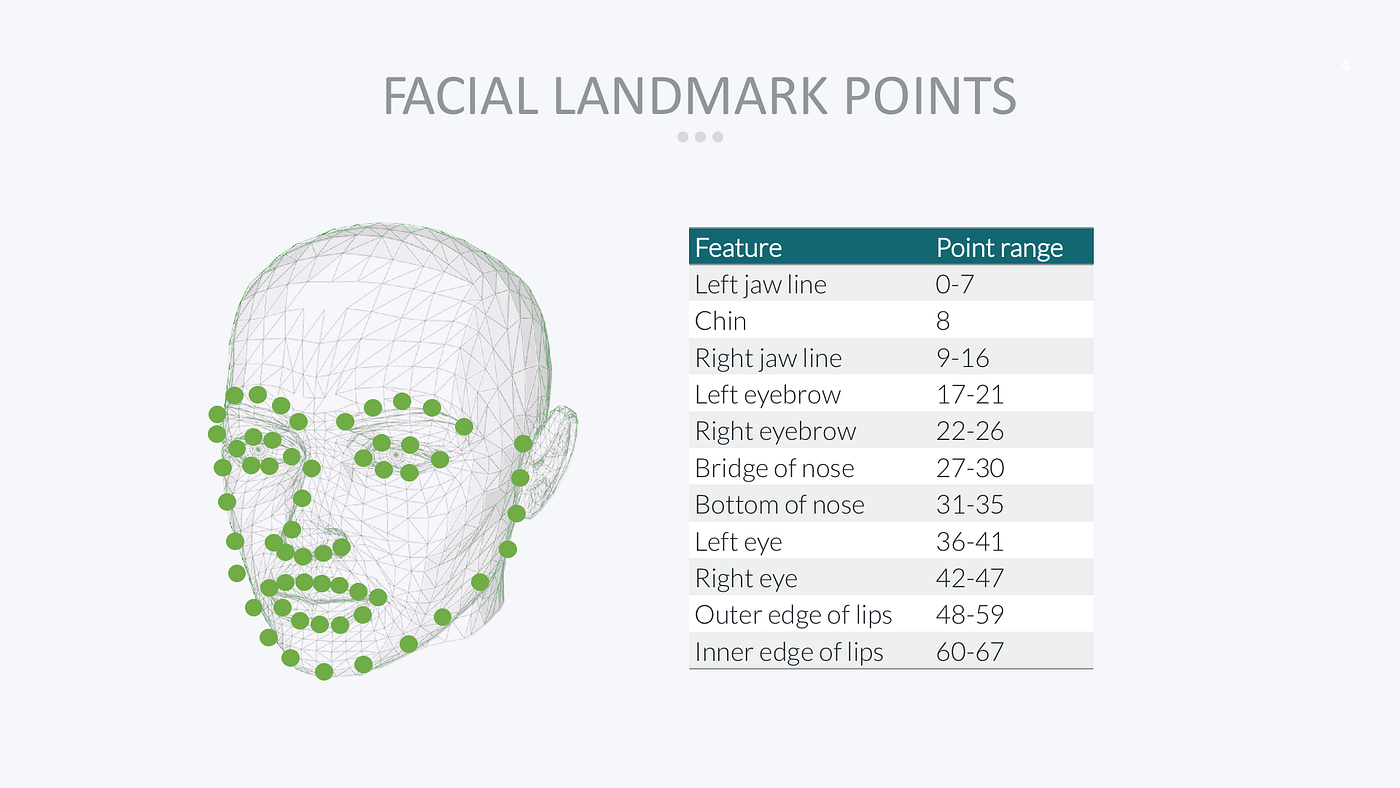
The Dlib face detector is pre-trained to recognize 68 landmark points that cover the jaw, chin, eyebrows, nose, eyes, and lips of a face.
Here’s what it looks like when I detect and plot every landmark point for every celebrity in the picture:

Dlib is pretty awesome in that it can track these points in real time. The computational overhead for calculating all these points is only 1ms!
Here’s the C# code to detect all landmark points in Bradley’s face. The ProcessImage method receives a bitmap of the entire selfie and performs landmark detection on it:
/// <summary>
/// Process the original selfie and produce the face-swapped image.
/// </summary>
/// <param name="image">The original selfie image.</param>
/// <param name="newImage">The new face to insert into the selfie.</param>
/// <returns>A new image with faces swapped.</returns>
private Bitmap ProcessImage(Bitmap image, Bitmap newImage)
{
    // set up Dlib facedetectors and shapedetectors
    using (var fd = FrontalFaceDetector.GetFrontalFaceDetector())
    using (var sp = new ShapePredictor("shape_predictor_68_face_landmarks.dat"))
    {
        // convert image to dlib format
        var img = image.ToArray2D<RgbPixel>();

        // find bradley's faces in image
        var faces = fd.Detect(img);
        var bradley = faces[0];

        // get bradley's landmark points
        var bradleyShape = sp.Detect(img, bradley);
        var bradleyPoints = (from i in Enumerable.Range(0, (int)bradleyShape.Parts)
                             let p = bradleyShape.GetPart((uint)i)
                             select new OpenCvSharp.Point(p.X, p.Y)).ToArray();

        // remainder of code goes here...
    }
}
I start by instantiating a FrontalFaceDetector and a ShapePredictor. Please note two things about this code:
Detecting faces and detecting landmark points (called a ‘shape’) are two different things in Dlib, with wildly different performance. Detecting faces is very slow, whereas shape detection only takes ~1ms and can be done in real time.
The ShapePredictor is actually a machine learning model that loads from a fully-trained data file. You can re-train the shape predictor on anything you like: human faces, cat & dog faces, plants, objects, and much more.
Dlib uses a different image format than the NET framework (it’s written in C++, remember?) so I need to convert the selfie before I start. The ToArray2D<> method converts my bitmap to an array of RgbPixel structs which is what Dlib uses.
Then I use Detect() to detect all faces in the image, and just grab the first one which happens to be Bradley Cooper. The result is a rectangle that identifies where Bradley’s face is in the picture.
Next, I call Detect() on the shape predictor and provide the selfie and the face rectangle. The result is a class that has a GetPart() method I can use to retrieve the coordinate of any landmark point.
My upcoming face swap code relies heavily on OpenCV code which has its own point structs. So my last line is a LINQ expression that converts the Dlib points to OpenCV points.
Seriously, 80% of all computer vision code is just converting points and rectangles from one library format into another 😉
The next thing I need to do is calculate the Convex Hull of the landmark points. This is just a fancy way of saying I want the outermost points that form a smooth boundary around the face:
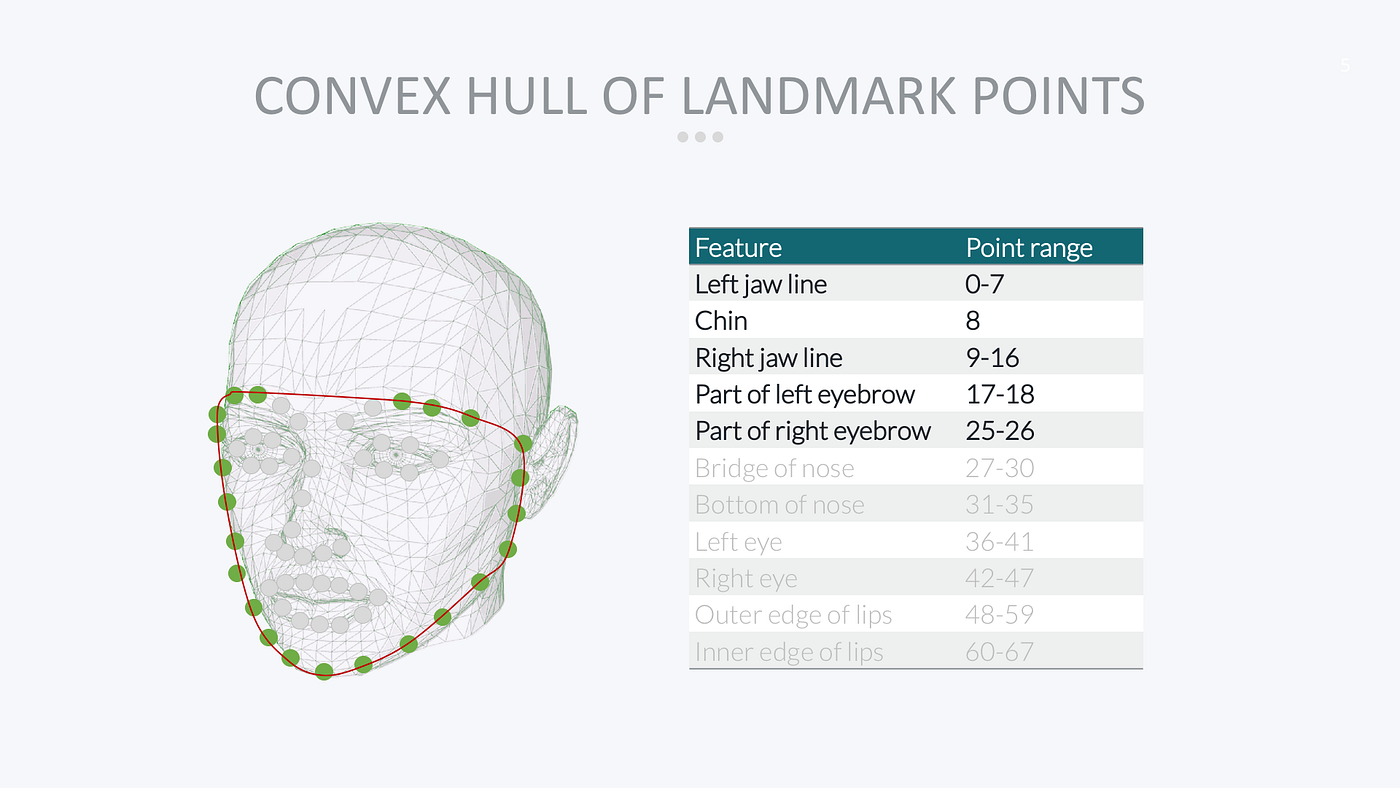
OpenCV has a built-in function that can calculate the convex hull for me:
// get convex hull of bradley's points
var hull = Cv2.ConvexHullIndices(bradleyPoints);
var bradleyHull = from i in hull
                  select bradleyPoints[i];

// the remaining code goes here...
The ConvexHullIndices() method calculates the indices of all convex hull landmark points, so all I need to do is run another LINQ query to get an enumeration of those points for Bradley Cooper.
Here’s what the convex hull looks like on Bradley’s face:

Next, I need to repeat these steps with my own face:
// find landmark points in face to swap
var imgMark = newImage.ToArray2D<RgbPixel>();
var faces2 = fd.Detect(imgMark);
var mark = faces2[0];
var markShape = sp.Detect(imgMark, mark);
var markPoints = (from i in Enumerable.Range(0, (int)markShape.Parts)
                  let p = markShape.GetPart((uint)i)
                  select new OpenCvSharp.Point(p.X, p.Y)).ToArray();

// get convex hull of mark's points
var hull2 = Cv2.ConvexHullIndices(markPoints);
var markHull = from i in hull2
                  select markPoints[i];

// the remaining code goes here...
This is exactly the same code, but now I’m working on the newImage bitmap (which contains the image with my face) instead of image (which contains the selfie).
And here is my hull:

So at this point I have two convex hulls: one for Bradley’s face and one for my own face.
The next thing I need to do is calculate the Delaunay Triangles on my face and then Warp them so that they match Bradley’s face exactly.
Delaunay Triangulation is a process that creates a grid of triangles that entirely covers Bradley’s face. Each triangle is made up of three unique landmark points on Bradley’s convex hull.
Here’s what that looks like. The blue lines form the Delaunay triangles:

Next, I’ll Warp each triangle from my face to Bradley’s face. A warp is a linear transformation that distorts the triangle so that its three corners fit the new face exactly.
In the following diagram, a Delaunay triangle made up of landmark points 3, 14, and 24 on my face is warped so that it fits exactly on Bradley’s face and the three corners precisely match Bradley’s landmark points 3, 14, and 24:

The really nice thing about this process is that each triangle warp is a linear transformation. The pixels inside each triangle can be moved with a super-fast linear matrix operation.
There’s no linear relationship between the coordinates of my convex hull points and Bradley’s. If we tried to move all pixels directly, we would have to use a slow nonlinear transform. But by first covering Bradley’s face in Delaunay triangles and then warping each triangle separately, the whole operation becomes linear (and fast!).
Here’s how you can perform Delaunay Triangulation and Warping in C#:
// calculate Delaunay triangles
var triangles = Utility.GetDelaunayTriangles(bradleyHull);

// get transformations to warp the new face onto Bradley's face
var warps = Utility.GetWarps(markHull, bradleyHull, triangles);

// apply the warps to the new face to prep it for insertion into the main image
var warpedImg = Utility.ApplyWarps(newImage, image.Width, image.Height, warps);

// the remaining code goes here...
I’m using a handy Utility class with a GetDelaunayTriangles method to calculate the triangles on Bradley’s face, a GetWarps method to calculate the warp for each triangle, and an ApplyWarps method to apply the warps to my face to make it match Bradley’s convex hull.
The warpedImg variable now holds my face, sufficiently distorted to match Bradley’s convex hull:

There’s one more thing I need to do. The tone of my skin is different from Bradley’s. So if I simply plonk my image on top of his in the selfie, we’re going to see a jarring color change at the edge of my image:

To fix that, I’m going to use a very nice OpenCV function that can seamlessly blend one image into another and smooth out any color differences, called SeamlessClone.
Here’s how you do a seamless clone in C#:
// prepare a mask for the warped image
var mask = new Mat(image.Height, image.Width, MatType.CV_8UC3);
mask.SetTo(0);
Cv2.FillConvexPoly(mask, bradleyHull, new Scalar(255, 255, 255), LineTypes.Link8);

// find the center of the warped face
var r = Cv2.BoundingRect(bradleyHull);
var center = new OpenCvSharp.Point(r.Left + r.Width / 2, r.Top + r.Height / 2);

// blend the warped face into the main image
var selfie = BitmapConverter.ToMat(image);
var blend = new Mat(selfie.Size(), selfie.Type());
Cv2.SeamlessClone(warpedImg, selfie, mask, center, blend, SeamlessCloneMethods.NormalClone);

// return the modified main image
return BitmapConverter.ToBitmap(blend);
The SeamlessClone method needs two things to do its magic:
A mask to tell it which pixels to blend. I calculate the mask by taking Bradley’s convex hull and filling it with white pixels using the FillConvexPoly method.
A center point where the color should be 100% my skin tone. Pixels further away from this point will get more and more of Bradley’s skin tone. I estimate the center of Bradley’s face by calling BoundingRect to get a bounding box around his face, and then taking the center of this box.
Then I call SeamlessClone to perform the clone and store the result in the blend variable.
Here’s what the final result looks like:

You might be wondering why I need the convex hull in this process. Why not use all of the landmark points for calculating the triangles?
The reason is actually very simple. Compare my face with Bradley. Notice how he is smiling and I am not?
If I use all landmark points, the app will try to deform my entire face to match Bradley’s lips, nose, and eyes. It will spread my lips apart in an attempt to make me smile and show my teeth.
The results are not pretty 😅

By only using the convex hull points, the app can distort my jawline to match Bradley’s, but it can’t touch my eyes, nose, and mouth. That means my expression stays the same in the new image and that looks a lot better.
As a final step, I’ll apply an Instagram filter to smooth out the color difference even more:

And there you have it: irrefutable proof that Ellen and I are friends!
You can grab the complete source code from here: https://github.com/mdfarragher/ComputerVision_Bootcamp/tree/master/bootcamp_faceswap
Computer Vision With C#, OpenCV and DLib
I wrote this blog post as an experiment to see if I could create a Computer Vision training course in C#. The course would cover topics like object detection, object tracking, color processing, face detection and recognition, face swaps and much more. Throughout the course I would be building apps in C# and use OpenCV and DLib to perform all image transformations and object detection.
Is this something that would interest you? If so, let me know in the comments below this article and I'll consider building a C# computer vision course.
Featured Blog Posts
Check out these other blog posts that cover topics from my training courses.
Featured Training Courses
Would you like to learn more? Then please take a look at my featured training courses.
I'm sure I have something that you'll like.
MDFT Academy
- Community
Become a member and get access to every online training course on this site.
Would You Like To Know More?
Sign up for the newsletter and get notified when I publish new posts and articles online.
Let's stay in touch!